

I remember the first time I tried to start a ‘sustainable’ garden in my backyard. I bought expensive annual seeds, spent hours every weekend weeding, and panicked every time a bug landed on a leaf. It was exhausting. Then I discovered permaculture for beginners, and my entire perspective changed. Permaculture isn’t just about growing food; it’s about designing an ecosystem where nature does most of the heavy lifting. Instead of fighting against the yard, you work with it. If you are feeling overwhelmed by the technical jargon of ‘swales’ and ‘guilds,’ don’t worry. The easiest way to dive in is by selecting the right plants that are hardy, multi-functional, and virtually impossible to kill.
Table of Contents
- ●Why Permaculture for Beginners is the Future of Home Gardening
- ●1. Comfrey (The Swiss Army Knife of Permaculture)
- ●2. Sunchokes / Jerusalem Artichokes (The Calorie King)
- ●3. Elderberry (The Backyard Medicine Chest)
- ●4. Goumi or Autumn Olive (The Nitrogen Fixers)
- ●5. Rhubarb (The Perennial Vegetable)
- ●6. Asparagus (The Patience Rewarder)
- ●7. Dwarf Fruit Trees (The Orchard Anchor)
- ●Essential Strategies in Permaculture: Designing Your First Guild
- ●Common Mistakes to Avoid
- ●Truth & Warning: The Reality of Permaculture
- ●Final Thoughts on Mastering Permaculture for Beginners
- ●Frequently Asked Questions
- ●Is permaculture expensive to start?
- ●Can I do permaculture in a small suburban yard?
- ●Do I need to be an expert in biology?
- ●How long before I get a full harvest?
- ●What happens if my plants die?
Key Takeaways:
- Permaculture focuses on perennial plants that return year after year, reducing labor.
- A successful permaculture garden starts with ‘dynamic accumulators’ like Comfrey.
- Guild building involves grouping plants that support each other’s growth naturally.
- Low-maintenance edible crops like Sunchokes and Rhubarb provide high caloric yields for minimal effort.
- Always observe your specific microclimate before planting to ensure long-term success.
Why Permaculture for Beginners is the Future of Home Gardening
Traditional gardening often feels like a battle against the elements. You till the soil, which destroys microbial life, and then add chemical fertilizers to compensate. In permaculture, we follow three core ethics: Earth Care, People Care, and Fair Share. By adopting these principles, you create a yard that actually regenerates the environment rather than depleting it. For those just starting out, focusing on perennials is the ultimate ‘hack’ because these plants establish deep root systems that survive harsh winters and droughts. To learn more about soil health, check out our guide on 15 Sustainable Gardening Practices.
- Reduced Labor: Once established, these plants require little to no weeding or watering.
- Soil Regeneration: Permaculture plants often fix nitrogen or pull minerals from deep underground.
- Biodiversity: A diverse garden is less susceptible to pests and diseases.
- Cost Efficiency: You buy the plant once, and it provides food and medicine for decades.
- Resilience: Perennial systems are far more resistant to climate change and extreme weather.
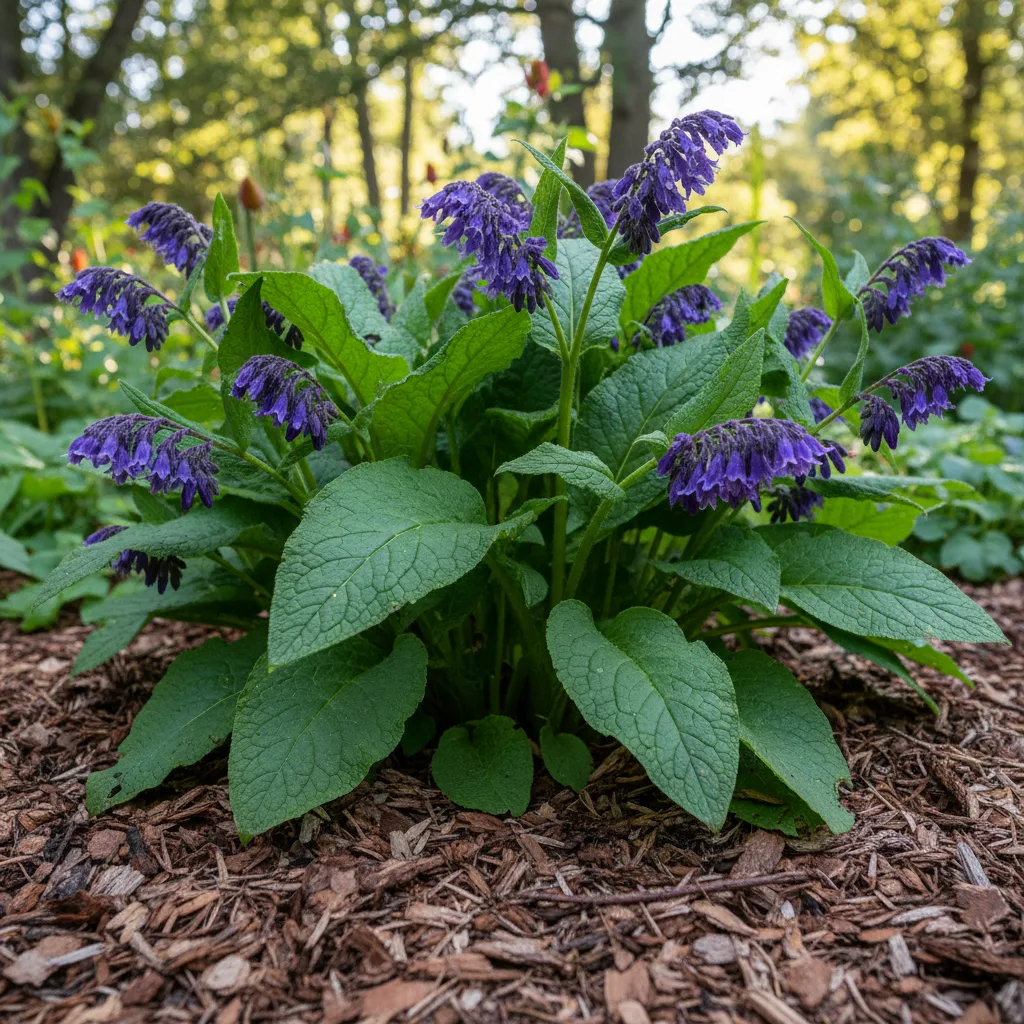
1. Comfrey (The Swiss Army Knife of Permaculture)
If there is one plant that defines a beginner-friendly permaculture setup, it is Comfrey. This plant is a ‘dynamic accumulator,’ meaning its deep taproot mines minerals like potassium and calcium from deep in the subsoil and brings them to the leaves. When the leaves die back or are cut, those nutrients become available to other plants. It is essentially a living fertilizer factory. According to the Permaculture Research Institute, Comfrey is essential for building organic matter in depleted soils.
- Function: Nutrient accumulator, pollinator magnet, and mulch producer.
- Placement: Plant it at the base of fruit trees to provide an automatic ‘chop and drop’ mulch.
- Hardiness: Extremely hardy; it can survive almost any US climate zone.
- Caution: Once you plant Comfrey, it is very hard to move because even a tiny root fragment will grow into a new plant.
- Varieties: Look for ‘Bocking 14’ cultivar, as it is sterile and won’t spread seeds everywhere.
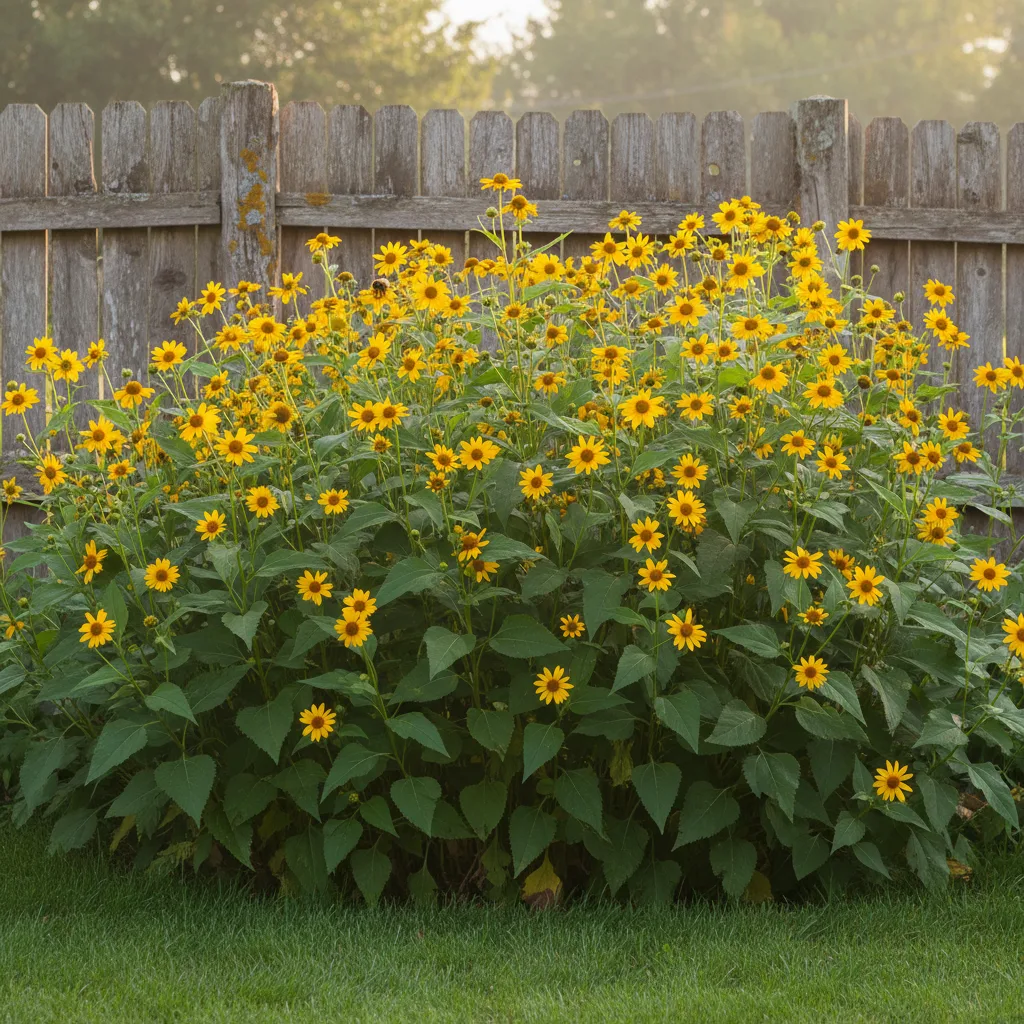
2. Sunchokes / Jerusalem Artichokes (The Calorie King)
Sunchokes are the ultimate survival food. These North American natives are actually a species of sunflower that produce edible tubers underground. They are incredibly prolific and can grow in poor soil with almost no intervention. For anyone interested in food security, Sunchokes are a must-have. They provide a crunchy, nutty flavor similar to water chestnuts when raw, or a creamy potato-like texture when roasted. For best results, use the no-dig method to keep the soil structure intact when harvesting.
- Growth: They can reach heights of 10 feet, providing excellent summer privacy screening.
- Harvest: Dig them up after the first frost for the sweetest flavor.
- Yield: A small patch can produce dozens of pounds of food annually.
- Inulin: They are high in inulin, which is a great prebiotic but can cause gas if eaten in large quantities (hence the nickname ‘fartichokes’).
- Maintenance: Mow around the patch to prevent them from taking over the whole yard.
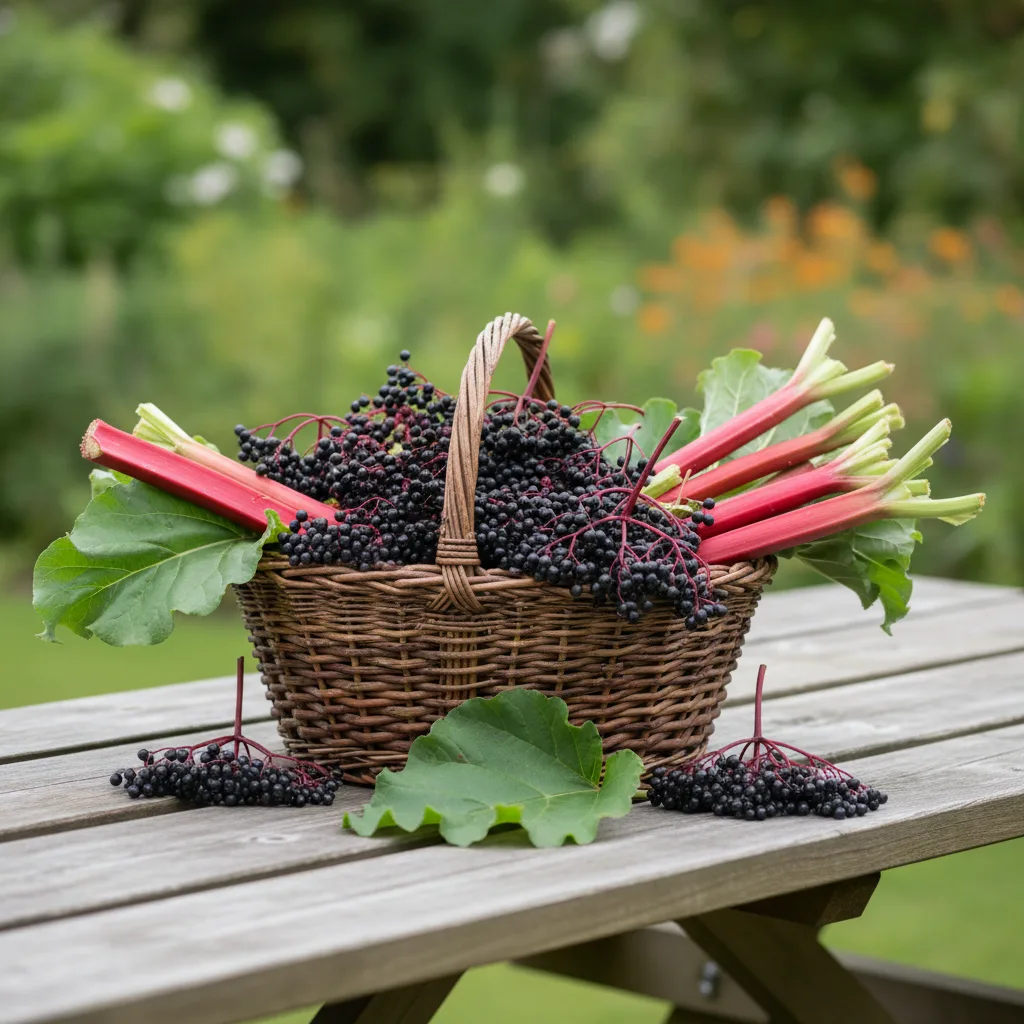
3. Elderberry (The Backyard Medicine Chest)
Elderberries are a staple in introductory permaculture because they offer both ecological and medicinal benefits. These shrubs grow quickly and produce beautiful white flowers followed by clusters of dark purple berries. They are fantastic for birds and beneficial insects, making them a cornerstone of any wildlife-friendly garden. The berries are famous for their immune-boosting properties, but remember they must be cooked before consumption. The USDA notes that native elderberries are highly adaptable to various soil types.
- Eco-Benefit: Provides nesting sites for small birds and nectar for pollinators.
- Culinary Use: Excellent for syrups, jellies, and wines.
- Soil: Prefers moist, well-drained soil but is surprisingly drought-tolerant once established.
- Spacing: Give them about 6-10 feet of room to spread out.
- Pollination: Planting two different varieties will often result in a much larger berry harvest.
4. Goumi or Autumn Olive (The Nitrogen Fixers)
In a permaculture system, we don’t buy bags of nitrogen fertilizer. Instead, we plant ‘nitrogen fixers.’ Goumi (Elaeagnus multiflora) is a shrub that has a symbiotic relationship with bacteria in its roots, which takes nitrogen from the air and puts it into the soil. This benefits every plant growing nearby. Plus, Goumi produces tart, cherry-like berries that are packed with lycopene. For more on building healthy soil, see our tips on starting home composting.
- Function: Fertilizes the soil while providing edible fruit.
- Yield: Extremely high producers; a single bush can yield several gallons of berries.
- Hardiness: Very resistant to pests and can grow in Zone 4 through 9.
- Permaculture Tip: Plant them on the windward side of your garden to act as a nitrogen-rich windbreak.
- Alternative: If Goumi isn’t available, Sea Buckthorn is another excellent nitrogen-fixing option.
5. Rhubarb (The Perennial Vegetable)
Rhubarb is often the first harvest of the spring, providing a much-needed tart flavor after a long winter. It is a long-lived perennial that can produce for 20 years or more. Because it has huge leaves, it acts as a natural groundcover, shading out weeds and keeping moisture in the soil. It’s an essential component for any novice permaculture design because it requires almost zero maintenance once the crown is established. You can find more about timing your crops in our 2026 Planting Calendar.
- Harvest: Only eat the stalks; the leaves contain high levels of oxalic acid and are toxic.
- Soil: Rhubarb is a heavy feeder and loves a thick layer of compost every spring.
- Shade Tolerance: It can handle partial shade better than most edible vegetables.
- Division: You can divide the roots every few years to create new plants for free.
- Utility: The large leaves make a great addition to the compost pile as a green nitrogen source.
6. Asparagus (The Patience Rewarder)
Asparagus is the ultimate ‘slow food.’ It takes 2-3 years to establish, but once it does, a single patch will provide delicious spears for 30 years. In a permaculture yard, we want to maximize the output-to-input ratio, and asparagus is the champion of this. It fits perfectly into a garden ‘guild’ under fruit trees. Research from Oregon State University Extension suggests that perennial vegetables like asparagus significantly reduce the carbon footprint of your home kitchen.
- Establishment: Buy ‘crowns’ instead of seeds to save yourself a year of waiting.
- Weed Control: Use a heavy mulch of straw or wood chips to prevent competition.
- Pests: Asparagus beetles can be a nuisance; encourage predatory wasps to handle them naturally.
- Companion Planting: Tomatoes and asparagus are great companions; the tomatoes repel asparagus beetles, and the asparagus repels root-knot nematodes.
- Winter Care: Leave the ferns standing until they turn brown to return nutrients to the roots.
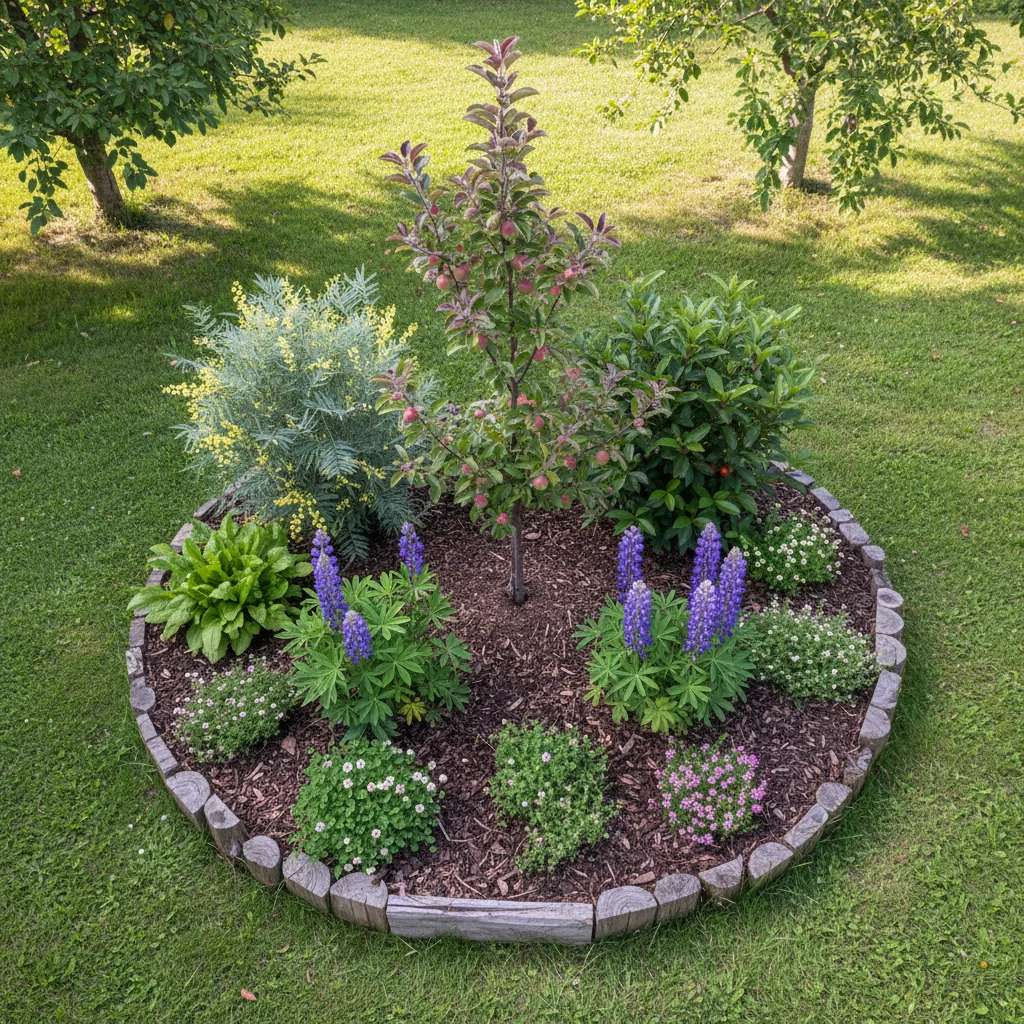
7. Dwarf Fruit Trees (The Orchard Anchor)
No permaculture garden is complete without a tree. For smaller yards, dwarf or semi-dwarf apple, pear, or cherry trees are ideal. These serve as the ‘canopy layer’ for your garden guild. By planting a tree, you create a microclimate that offers shade and wind protection for smaller plants. The Plants For A Future database is an excellent resource for choosing the right tree species for your specific region.
- Variety: Choose ‘self-fertile’ varieties if you only have room for one tree.
- Stacking Functions: The tree provides fruit, shade, privacy, and nesting space for birds.
- Guild Building: Plant your Comfrey, Rhubarb, and nitrogen fixers in a circle around the tree’s drip line.
- Pruning: Dwarf trees are much easier to prune and harvest without needing a ladder.
- Pollination: If you don’t have bees, choose varieties that attract native orchard bees.
Real Example: The Low-Cost Guild Experiment
Last year, I designed a simple 10×10 foot guild in a sunny corner of my yard. Here is the data for new permaculture enthusiasts to consider:
- Initial Cost: $145 (1 Apple tree, 3 Comfrey crowns, 5 Sunchoke tubers, 2 Elderberry shrubs).
- Labor: 4 hours of planting, 1 hour of mulching.
- Year 1 Harvest: Minimal (mostly herbs and a few sunchokes).
- Year 2 Forecast: 15 lbs of Sunchokes, 5 lbs of Elderberries, and significantly improved soil tilth.
- Water Savings: After the first 3 months, I stopped watering entirely thanks to 4 inches of wood chip mulch.
Essential Strategies in Permaculture: Designing Your First Guild
A ‘guild’ is simply a group of plants that help each other grow. Think of it like a community. You have the ‘leader’ (the fruit tree), the ‘protectors’ (aromatic herbs that repel pests), and the ‘helpers’ (nitrogen fixers). When you are just starting with permaculture, don’t try to plant 50 different species at once. Start with one guild centered around a fruit tree and expand as you learn. Reference the Rodale Institute for scientific backing on how these polycultures improve soil health over time.
- Observation: Spend a full season watching where the sun hits and where water pools in your yard.
- Mulching: Never leave soil bare. Use wood chips, straw, or ‘living mulches’ like clover.
- Water Management: Place your thirstiest plants near your rain barrels or greywater outlets.
- Density: Plant closely to mimic a forest floor and naturally suppress weeds.
- Diversity: Mix flowers, vegetables, and shrubs to confuse pests and attract predators.
Common Mistakes to Avoid
Even the best-intentioned beginner permaculture projects can hit roadblocks. Here is what I wish I knew before I started:
- Invasive Species: Some ‘permaculture stars’ like Autumn Olive or Mint can be invasive in certain regions. Check with your local extension office first.
- Over-Engineering: You don’t need to dig massive swales on a flat suburban lot. Keep it simple.
- Neglecting Maintenance: ‘Low maintenance’ doesn’t mean ‘no maintenance.’ You still need to prune and harvest to keep the system healthy.
- Ignoring the Soil: Plants are only as healthy as the soil. Avoid chemical fertilizers that kill the fungal networks.
- Planting Too Much: Start small. A well-tended 4×4 bed is better than a neglected acre.
Pro Tips for Faster Growth:
- Chop and Drop: Don’t throw away plant trimmings. Drop them right at the base of your plants to return nutrients.
- Pee on Your Compost: (Yes, really!) Human urine is a sterile, high-nitrogen liquid gold for your compost pile.
- Sheet Mulching: Layer cardboard and wood chips over grass to create new garden beds without tilling.
- Microclimes: Use south-facing walls to grow heat-loving plants like figs in cooler zones.
- Seed Saving: Allow some of your plants to go to seed to get free plants for next year.
Truth & Warning: The Reality of Permaculture
I have to be honest with you: the first two years of a permaculture garden can look a little… messy. Your neighbors might think you’ve given up on your yard. But by year three, when your trees are full of fruit and your soil is crawling with earthworms, they will be the ones asking for your secrets. Also, be warned that embracing permaculture requires a shift in mindset. You have to learn to tolerate a few ‘pests’ because they are food for the beneficial insects you want to attract. For more on this, visit Cornell Small Farms.
- Aesthetics: Permaculture follows function over form. It looks like a forest, not a manicured lawn.
- Pests: A few holes in a leaf is a sign of a healthy ecosystem, not a failure.
- Time: Perennials take time to ‘sleep, creep, and leap.’ Be patient in the first few seasons.
- Local Laws: Check your HOA or local ordinances regarding ‘natural’ landscaping to avoid fines.
- Sustainability: True permaculture uses on-site resources first (like rainwater and compost) before buying outside inputs.
Final Thoughts on Mastering Permaculture for Beginners
Starting a permaculture garden is one of the most rewarding things you can do for your health and the planet. By choosing hardy plants like Comfrey, Sunchokes, and Elderberries, you build a foundation that will produce food for decades with minimal effort. Remember that learning permaculture is a journey of observation. Don’t be afraid to make mistakes—nature is the best teacher you’ll ever have. Start with one small corner of your yard today, and watch as it transforms into a lush, self-sustaining sanctuary.
Frequently Asked Questions
Is permaculture expensive to start?
- Actually, it can be much cheaper than traditional gardening! By using sheet mulching, seed saving, and propagating your own plants, you can build a massive garden for the cost of a few starter perennials.
Can I do permaculture in a small suburban yard?
- Absolutely. Many of the most successful permaculture sites are small residential lots. Focus on ‘vertical stacking’ by using trellises and dwarf trees to maximize your space.
Do I need to be an expert in biology?
- Not at all. Basic permaculture is about common sense and observation. If you can watch how water flows when it rains, you already have the most important skill.
How long before I get a full harvest?
- You will get small harvests (like herbs and fast-growing tubers) in the first year. Fruit trees and berries usually take 3-5 years to reach peak production, which is why it’s best to plant them now!
What happens if my plants die?
- In permaculture, a dead plant is just compost. Use it as a learning experience. Maybe the spot was too wet or too shady. Simply try a different plant in that location next time.

Written by Mangaleswaran
Mangaleswaran is a dedicated sustainable living expert and the founder of EcoDweller. With a deep passion for renewable energy, he specializes in simplifying complex green technologies—like solar power and home efficiency—for the modern homeowner. His mission is to empower individuals to reduce their environmental impact while building more cost-effective, eco-friendly homes for the future.
Follow on Facebook